When you end up with too much produce as a result of a bountiful harvest or an enthusiastic trip to the farmer’s market, sometimes you run the risk of your vegetables spoiling before you even get to cook with them. Not only does it sting because it’s money down the drain, but also because it adds to the already bad food waste problem. Next time you end up with too many vegetables, try pickling. While the idea of canning and sealing vegetables in a pot of boiling water may sound intimidating, the steps are fairly simple. Here’s how to ferment and pickle vegetables at home.

Benefits of Pickled Vegetables
Not only does pickling help prevent food waste (plus pickled food lasts for months), but it also gives you something that’s good for you. According to Medical News Today, pickles and other fermented foods contain probiotics, which are good for your gut. And a healthy gut comes with a boosted immune system. Pickles also contain vitamin A, which supports healthy vision and vitamin K, which helps regulate calcium levels.
Tools for Pickling and Fermenting
Having the right tools is as equally important as deciding which vegetables you want to use. Here’s what you’ll need to get started pickling and fermenting at home.

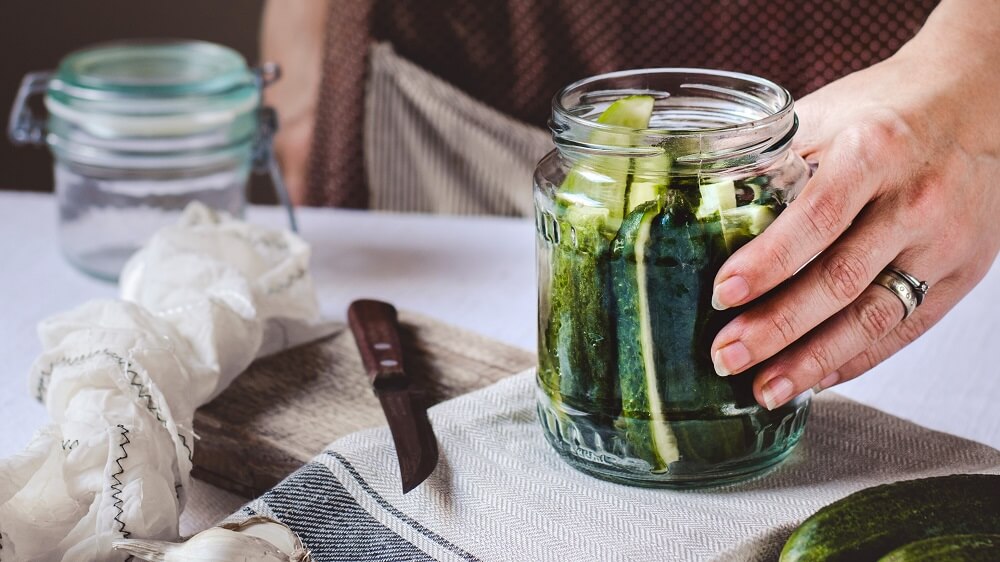
1. Mason Jars
Invest in some mason jars. Be sure to pick a size that will work for the largest size pot you ow if you’re doing true canning and sealing. Remember that at least one inch of water should cover the pot at all times. Thankfully, you don’t have to worry about buying a new pot if the mason jars you already have at home are too big—just buy some smaller jars. Mason jars are handy to have around even when you’re not pickling. Use those leftovers to store pantry goods, or experiment with quick pickling.
Check it out here.

2. Canning Utensil Set
If you’re planning on doing some honest-to-goodness, old-fashioned canning, then you’ll need a canning utensil set. This six-piece set comes with everything you need, including tongs, a jar lifter, a lid lifter, an extra-wide funnel, a jar wrench, and a bubble popper, which ensures that no air is trapped inside the jar.
Check it out here.

3. Vinegar
Stock up on vinegar—you’ll need a lot of it if you’re going to be pickling frequently. Regular old white vinegar will get the trick done. Pro-tip: vinegar is handy to have around the house for making your own cleaning products.
Check it out here.
4. Fermentation Tool Set
If homemade sauerkraut and kimchi are what you want, then you’ll need the right tools. This fermentation tool kit comes with everything you need to convert mason jars into sauerkraut-making machines: glass weights and a wooden tamper.
Check it out here.

5. Fermenting Jar
A fermenting jar lets you pickle and ferment without having to go through the traditional canning-and-sealing process. Simple slice your vegetables, add the brine, add the weight, and seal the jar. According to reviewers, this three-liter Kilner jar can handle up to three heads of cabbage. It also comes with a booklet of recipes to get you started.
Check it out here.
6. A Pickling Cookbook
If you want inspiration beyond the tips above, then consider picking up a cookbook. “The Farmhouse Culture Guide to Pickling and Fermenting” contains more than 100 recipes, including hot sauces and fermented drinks. The book “Fermented Vegetables” has basic pickled vegetable recipes, plus unique options like curried golden beets, pickled green coriander, and carrot kraut. For regional varieties, try “Asian Pickles,” which contains recipes from Japanese, Korean, Vietnamese, Chinese, and Indian cuisine.

How to Pickle and Ferment at Home
Making your own pickled vegetables is easy—here’s how to do it.
Step 1: Choose Your Vegetables
Arguably the most important step is picking which vegetable you’re going to work with. You can stick to classics like dill pickles, sauerkraut, and kimchi or branch out with other types of vegetables. Consider the freshness of your vegetables. Pickling is a great way to reduce food waste by preserving produce that’s going past its prime. But, you don’t want them to be too soft, which will result in softer pickles.
Try working with vegetables like peppers, carrots, cauliflower, and radishes. But don’t feel limited to those! Always remember to cut your produce into smaller, even pieces to ensure that everything pickles evenly.
Step 2: Choose Your Spices
Up next is to choose which herbs and spices you want to add to the jar. The most common blends use a combination of peppercorns, coriander seeds, mustard seeds, allspice, and bay leaf.
Step 3: Pickling
Finally, it’s time to pickle. If you’re using the old-fashioned method of canning, you’ll need two large pots that are big enough for your jars: one for preparing and one for canning. First and foremost, you need to sterilize the jars, which can be done by boiling them for 10 minutes.
In another pot, combine 2 cups vinegar, 2 cups water, and 2 tablespoons of salt. Bring to a boil. This is a basic sour pickling brine recipe that can be adjusted based on what you’re making. For a sweeter pickle, add a tablespoon of sugar.
Lift your sterilized jar out of the pot using tongs or a jar lifter and place it on a cutting board (hot glass can shatter if placed on a cold surface, like marble or granite). Add garlic and fresh dill (one clove and a few springs for pints and 2 cloves and double the springs for quart jars), followed by as many vegetables as you can pack in. Pour over the brine, leaving at least a half-inch of room at the top. Slide a bubble popper tool into the jar to eliminate air bubbles and clean the rim of the jar. Seal the jars with their lids (you can reuse the rings for future pickling projects, but you will need a new lid every time). Don’t make it too tight—you still want air to be able to escape the jar.
Place the jar in the large pot, cover the bottom with at least an inch of water, and boil for 10 minutes. Remove the jar using tongs, place it back on the cutting board, and let cool for a full 24 hours. Properly sealed jars will have an indented lid—it should be like a metal lid that “pops” open. Refrigerate after this. Your homemade pickles should last up to six months.